

Measuring For a Custom Western Saddle | How to Take the Back Measurements of Your Horse
The Ultimate Guide to Measuring a Horse for a Custom Western Saddle
How to Measure a Horse for a Custom Western Saddle: Step-by-Step Guide.
Finding a saddle that truly fits is one of the best investments you can make for your horse’s comfort, performance, and long-term soundness. A poorly fitting saddle creates painful pressure points, restricts movement, and can lead to behavioral issues.
For riders in demanding Western disciplines—whether you are pulling calves on the ranch, chasing thousandths of a second on the pattern, or climbing steep mountain switches—a standard off-the-rack tree rarely cuts it.
This comprehensive guide will walk you through exactly how to Measure a Horse for a Custom Western Saddle saddle tailored for ranch, roping, barrel, and trail riding.
1. Mapping the Western Saddle Support Area
Before bending any wires or taking measurements, you must locate your horse’s natural weight-bearing surface. A Western saddle tree relies on large, rigid bars to distribute weight, and these bars must sit entirely within a specific boundary.
The Front Boundary: Shoulder Clearance
Stand your horse squarely on level ground. Feel along the shoulder for the hard, rear edge of the shoulder blade (scapula). Mark this line with chalk. Your custom saddle tree must sit roughly two inches behind this line. This allows the shoulder blade to slide backward freely as the horse extends its front legs.
The Rear Boundary: The 18th Rib
Locate your horse’s last rib. Trace it gently upward until it meets the spine, and make a chalk mark. This marks the junction where the thoracic vertebrae end and the lumbar vertebrae begin. The rigid bars of a Western saddle must never extend past this 18th rib. The lumbar loin area is weak and flexible; putting weight here causes severe soreness and roach-backed framing.
Measuring the Support Length
Take a flexible fabric measuring tape and measure the straight distance along the spine between your front and rear chalk marks. This gives you the maximum bar length your horse can comfortably support.
2. Creating a Complete Back Blueprint (The 4-Point Tracing)
English saddles often rely on a single wither tracing, but Western saddle makers require a complete map of the horse’s back. Because a Western tree distributes heavy loads over a wider surface, you must capture the changing angles of the spine from front to back.
To do this, use a 24-inch flexible curves ruler, a soldering wire, or a thick piece of moldable copper wire.
Tracing 1: The A-Fork / Wither Measurement
- Position your moldable wire directly over the spine, two inches behind the rear edge of the shoulder blade (your front boundary mark).
- Mold the wire firmly down over the withers, pressing it flush against the skin on both sides.
- Carefully lift the wire, lay it flat on a large sheet of paper, and trace the inside curve. Label this “Tracing 1: Wither / A-Fork”.
Tracing 2: The Mid-Back (The Twist)
- Locate the lowest point of your horse’s back, which is typically where your seat sits.
- Mold the wire across the spine at this point. This captures the “twist” of the back as the ribs begin to widen.
- Trace it onto your paper and label it “Tracing 2: Mid-Back”.
Tracing 3: The Cantle / Loin Area
- Place your wire directly over your rear boundary mark at the 18th rib.
- Press it down across the loin to capture the flatter, wider angle where the rear of the saddle bars will rest.
- Trace and label this “Tracing 3: Cantle / Loin”.
Tracing 4: The Rock / Spine Profile
- Straighten your wire and lay it horizontally directly along the top of the horse’s spine, starting at the withers and running back to the 18th rib.
- Press it down to copy the exact profile, capturing whether your horse has a straight back, a dipped back, or a prominent curve.
- Trace this long profile line and label it .
3. Standard Western Tree Measurements: Decoding SQHB vs. FQHB
Once you have your paper drawings, you can compare your shapes to industry-standard tree specifications. While custom makers build to exact dimensions, they use standard classifications as a baseline.
The two primary factors to look out for are gullet width (the horizontal distance between the front forks) and bar angle (the steepness of the slant matching the ribs).
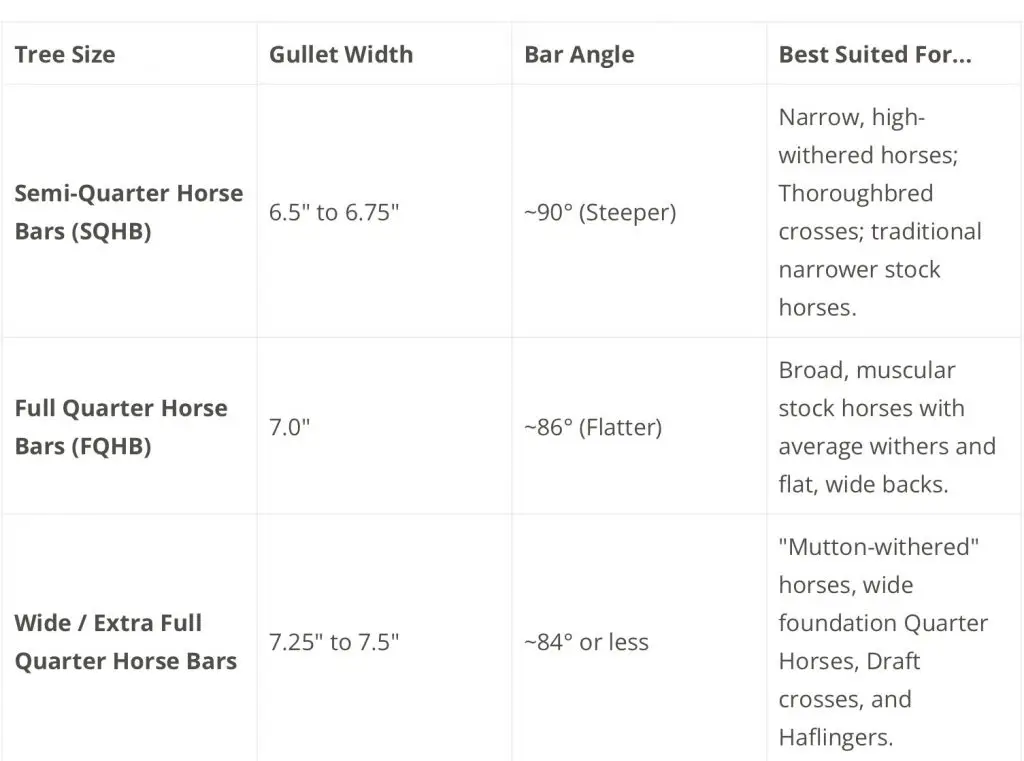
Translating Your Tracings to Tree Specs
To find your horse’s baseline, look at Tracing 1 (Wither).
- To Find Bar Angle: Place a protractor on the paper tracing. Measure the angle where the shoulders slope down away from the spine. A sharp 90-degree slope points to an SQHB tree. A wider, flatter 86-degree slope requires an FQHB tree.
- To Find Gullet Width: Measure down exactly 3 inches vertically from the top center of your wither tracing. Then, measure the horizontal distance across the tracing at that specific 3-inch depth line. If it measures under 6.5 inches, your horse leans toward SQHB. If it measures 7 inches or more, they need an FQHB or wide tree.
4. Tailoring Your Measurements by Western Discipline
A standard measurement profile must be adjusted to account for how a horse moves and works within specific Western disciplines.
Ranch & Roping Saddles
Ranch and roping horses experience massive, sudden leverage forces when dallying cattle. To prevent the tree from twisting or digging into the horse’s spine, roping saddles require maximum surface contact.
- What to look for: Look for trees with wider, thicker bars. Because the bars are physically thicker, a roping saddle with a 6.75″ gullet will fit tighter than a barrel saddle with a 6.75″ gullet. Ensure your Loin Tracing (Tracing 3) is completely flush; if the loin angle is too steep, the back of the saddle will pop up under a heavy rope load.
Barrel Racing Saddles
Barrel horses need extreme shoulder flexibility to drop low, turn hard, and explode out of a pocket.
- What to look for: Pay close attention to Tracing 1 (Wither). Take this measurement with the horse’s head up, as barrel horses carry themselves higher at a run. Barrel trees require significant front “flare” (a sweeping outward curve at the front tip of the bars) to keep the rigid wood or fiberglass from pinching the shoulder blades during a hard pivot.
Trail & Endurance Saddles
Trail horses spend hours carrying weight across uneven terrain and steep inclines.
- What to look for: Your Rock Profile (Tracing 4) is your most vital tool here. If a trail saddle has too little rock (too straight), it will “bridge,” putting all the rider’s weight on the front shoulders and rear loins while leaving a hollow gap in the middle. If it has too much rock, it will pivot back and forth like a rocking chair, creating severe fluid bumps and sores over long miles.
- Internal Anchor Text Suggestion: “For a deeper dive into adjusting your rigging to stabilize these fits on steep terrain, see our guide on [how to properly rig a western trail saddle].”
5. Visual Context: Photos Custom Saddlers Require
A custom saddle maker cannot build a tree from flat wire lines alone; they need to see the horse’s muscle condition and conformation to interpret your drawings.
Cross-tie your horse on perfectly flat, level ground in bright lighting. Keep the horse’s head straight and in a natural up position, then take these four essential photos:
- Direct Side Profile: Stand 15 feet away, square with the horse’s middle. Capture the entire horse from nose to tail at eye level.
- Three-Quarter Front View: Stand slightly to the side of the shoulder, looking backward along the horse’s ribcage to show the exact definition and slope of the withers.
- Rear View Looking Forward: Stand safely behind the hindquarters (use a zoom lens if necessary). Look over the croup toward the neck to show the symmetry of the back muscles.
- Wire Templates on the Horse: Before removing each wire tracing, snap a quick photo of the wire sitting flush on your horse’s skin. This proves to the saddle maker that the wire was positioned in the correct spot and wasn’t distorted during removal.
Ready to Begin Your Custom Build?
Once you have your four paper tracings and conformation photos labeled, you have everything a professional saddler needs to construct a perfect tree. Take your time, measure twice, and ensure your horse is standing square.
Once you have measured your horse, you are now ready for the next step. Take the plunge and fill out our Saddle Estimate form to begin the process!
If you are ready to explore tree styles, leather tooling options, or want to discuss your measurements with our master saddler, reach out to us today Contact us!